Turkey Bacon Arugula Roll Up

A couple of months ago we gave you our Bacon Arugula Avocado Sandwich on Sourdough, but we wanted to give you a healthier version of one of our favorites.

For this recipe, we replaced the thick cut bacon with turkey bacon, and switched out the sourdough for a whole wheat tortilla or pita. This is a really simple lunch and super healthy and satisfying.

If you like our recipes, don’t forget to give us a follow so you don’t miss out on anymore tasty treats!

Bacon Arugula Roll Up

Bacon Arugula Roll Up 

Ingredients 

  • 3 Pieces  Turkey Bacon
  • Handful Arugula
  • Avocado (Half)
  • Kosher Salt
  • Pepper
  • Sriracha Mayo
  • 1 Whole Wheat Tortilla or Pita

Step 1: 

Cook your turkey bacon to your liking (microwave or stovetop) and set aside.

Pro tip: Turkey bacon tastes WAAAAY better if you cook it in a skillet. Trust us.

Step 2: 

In a small bowl mix together your arugula and Sriracha.

Step 3: 

Place the avocado on the tortilla and lightly mash it up and spread around the tortilla. Sprinkle the avocado with kosher salt and a little pepper.

Bacon Arugula Roll Up

Step 4: 

On top of the avocado add the arugula and then lay the bacon on top. Roll up and enjoy!

Bacon Arugula Roll Up

Bacon Arugula Roll Up

Bacon Arugula Roll Up

Easy and Healthy Shredded Chicken

We love chicken! Why? Because it’s so versatile, you can make grilled chicken, fried chicken, baked chicken, chicken wings, chicken thighs, chicken tenders, shredded chicken, you get the idea… you can use chicken in almost any dish!

Today’s recipe is super easy, and super healthy! We like to make a batch on Sunday’s and use it through out the week.

What’s great about this recipe is you don’t have to use marinara, it’s really a flexible dish and you can use all different kinds of seasoning! You can use this chicken on salads, burritos, tamales, sandwiches, soups, virtually anything you can think of, you can eat this chicken with.

Easy Shredded Chicken

Easy Shredded Chicken

Easy Shredded Chicken 

Ingredients 

  • 4 Boneless Skinless Chicken Breasts
  • 1 Cup Marinara Sauce
  • 1 Onion (Sliced)
  • 1 Tablespoon Fresh Rosemary or Rosemary Salt
  • 1/2 Chicken Broth (Or Water)
  • Garlic Salt

Step 1:

Rinse and pat the chicken dry with paper towels.

Step 2: 

Season both sides of the chicken with garlic salt (or any salt of your choosing.)

Step 3: 

In your crockpot, cover the bottom with marinara sauce. Put about half of the onions at the bottom on top of the marinara. Then place the seasoned chicken onto the onions. Cover with the rest of the marinara, onions, rosemary salt, and half a cup of chicken broth.

Step 4: 

Set the crockpot to high and cover and cook for 3.5 to 4 hours.  

Easy Shredded Chicken

Traditional Pork Carnitas

Happy Pre Taco Thursday! Today’s recipe is not only easy, but super delicious and a definite crowd pleaser.

We made these for a family dinner and everyone loved them! Did you know that carnitas translates to “little meats” and is typically made by braising the pork in oil or traditionally lard. Obviously our recipe doesn’t involve cooking the pork in lard or oil, but cooking it in the next best thing: BEER!

Remember when you get your pork shoulder/butt don’t trim the fat! The fat helps keep it juicy and gives it SO MUCH FLAVOR.

Pork Carnitas

Traditional Pork Carnitas 

Ingredients

  • 6 pounds of pork shoulder/or butt
  • Kosher Salt
  • 3 Tablespoons of Vegetable Oil
  • 2 Bottles of Modelo or Your Favorite Beer
  • 2 Cinnamon Sticks
  • 2 Bay Leaves
  • 2 Teaspoons Chipotle Chili Powder
  • 2 Teaspoons Chili Powder
  • 1/4 Teaspoons Cumin
  • 4 to 5 Tablespoons Garlic (Minced)

Step 1: 

Preheat your oven to 350°F.

Step 2: 

Depending on the size of your meat, you may want to cut the meat into manageable size chunks. Season both sides of the pork liberally with kosher salt.

Step 3: 

In a cast iron pot/dutch oven/or pot, heat your vegetable oil. When the oil is hot, brown all sides of the pork. Remove from the pan and and blot them dry with paper towels.

Step 4: 

Pour in two cups of beer to deglaze the bottom of the pan of all the delicious brown bits. Next add the cinnamon sticks, the bay leaves, chili powders, cumin and garlic. Stir until everything is mixed together.

Step 5:  

Next, add the pork back to the pot. If needed add a little bit more beer (or water if you’re out) to cover the pork about two/thirds of the way. Place in the oven uncovered for about 3.5 hours.

Step 6: 

When the meat is ready, remove the meat to a platter and let cool. Strain the cooking liquid and return to the pot. Skim as much fat off the top as you can. Turn on the heat and bring the liquid to a boil and then lower the temperature.

Step 7: 

While the liquid is reducing, allow the meat to cool until you can handle it. Shred the meat. Return the meat to the pot with the reduce liquid and serve.

Pork Carnitas

B.A.A Sandwich

Bacon. Arugula. Avocado. What more could we say? This sandwich is for those who are tired of the plain, and boring old B.L.T. (Or for those who don’t like tomatoes).

Do you know how awkward it is to order a BLT without the T?

B.A.A Sandwich

B.A.A Sandwich

B.A.A. Sandwich 

Ingredients

  • 6 Pieces of Bacon
  • 1 Ripe Avocado (Sliced)
  • Handful of Arugula
  • Mayonaise
  • Garlic Powder
  • Garlic Pepper
  • Kosher Salt
  • 4 Pieces of Sourdough Bread

**Makes two sandwiches

Step 1: 

Place bacon on a baking sheet covered in parchment paper, place the bacon in a cold oven and turn the heat to 400°, cook for about twenty minutes.

Step 2: 

Just before the bacon is finished cooking, toast your sourdough bread.

Step 3: 

Spread a little mayonnaise on both sides of the bread. Sprinkle both sides with garlic powder.

Step 4: 

Cut the avocado and spread evenly on two pieces of sourdough. Sprinkle the avocado with kosher salt and garlic pepper.

Step 5: 

When the bacon is finished cooking, remove from the oven, and transfer to paper towels and dab off any extra grease. Divide the bacon, three pieces per sandwich, and cut the pieces in half. Place on the bread.

Step 6: 

Take a handful or arugula and divide between the sandwiches. Cut in half and enjoy.

B.A.A Sandwich

Brunoise Rosemary Chicken Soup

Brunoise Rosemary Chicken Soup

Who doesn’t like chicken soup? It’s comforting, filling, and actually healthy. Well, today we made a chicken soup for your soul and for you OCD-er’s out there. Every thing in this soup is the same size, which makes for even distribution and cooking, the only thing that is different is the textures. Also, it just looks super cool!

This soup was made with leftovers or fridge scraps, so if you have different veggies, THEN FORGET IT, ITS OUR WAY OR THE HIGHWAY! or not. Just use whatever you can brunoise.


Brunoise Chicken Soup

What you need:

  • cutting board
  • knife
  • patience
  • heavy bottom pot

Ingredients:

  • chicken
  • carrots
  • celery
  • yukon gold potatoes
  • onions
  • garlic
  • zucchini
  • chicken broth
  • rosemary
  • turmeric
  • salt and pepper
  • garlic powder
  • onion powder

Step 1:

Preheat the oven to 350°. Place chicken in the on a baking sheet and drizzle with olive oil. Sprinkle liberally with salt and pepper. Put in the oven and bake for 20 to 25 minutes. Remove and let cool. Once cooled, cut the chicken to bite sized pieces and set aside.

Step 2:

In a medium sauce pan, warm up the chicken broth with some rosemary and crushed garlic, let it simmer while you cut your vegetables, strain (or pick out) rosemary and garlic before transferring to veggie pot.
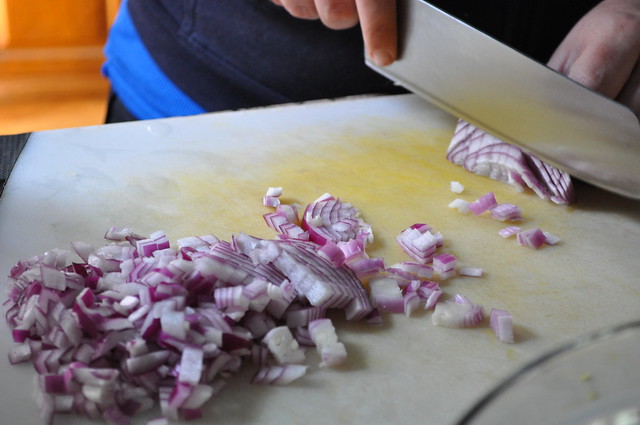
Step 3:

Peel carrots and Brunoise them, if you aren’t quite sure or haven’t done it in a while, here’s a quick video to help you, and the environment too, apparently.

Brunoise Rosemary Chicken Soup

Step 4:

Repeat with zucchini, onions, celery, and potatoes.
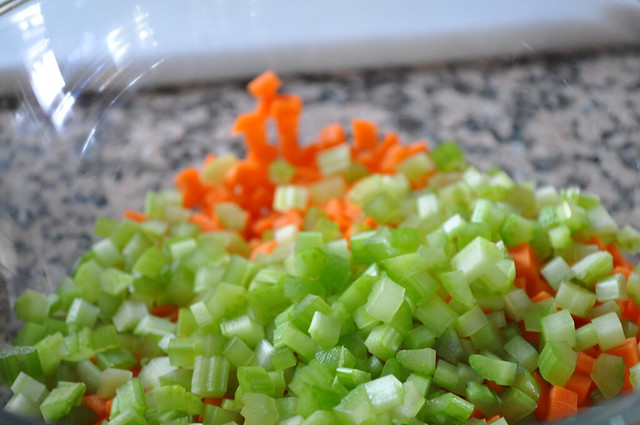
Brunoise Rosemary Chicken Soup

Brunoise Rosemary Chicken Soup

Brunoise Rosemary Chicken Soup

Brunoise Rosemary Chicken Soup

Brunoise Rosemary Chicken Soup

Step 5:

Heat some olive oil in the pot, and sauté onions and carrots for a few minutes, then add celery and zucchini, these guys don’t need to cook so long. Add salt, pepper to taste, and turmeric to add a beautiful color to the soup.
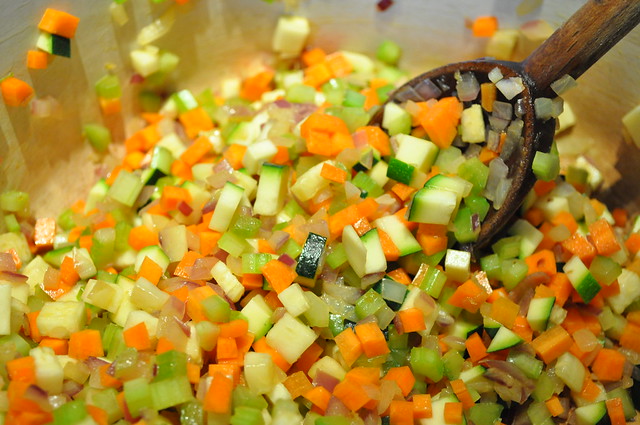
Brunoise Rosemary Chicken Soup

Brunoise Rosemary Chicken Soup

Step 6:

Add chicken broth to pot and let everybody simmer together for 10 minutes.

Step 7:

Add the chicken (cut same size of the veggies) and potatoes. Cook until potatoes are tender. Then EAT!

Brunoise Rosemary Chicken Soup

Brunoise Rosemary Chicken Soup

Note from Christie:

“The broth should smell beautifully rosemary-y and amazing, like you want to wear it as a perfume, which I personally think is a great idea. Imagine the intoxicating smell of a fresh baguette or the handsome aroma of roasted coffee, or the cozy smell of freshly baked cookies?! Okay, okay, I might have a problem but you know what, that’s ok. Me and food are in love, not in like, we are in a committed relationship and we go through ups and downs together.”

Chicken Curry Salad

Today’s recipe is a mix of two of our favorites, the Gelson’s Chicken Curry Salad and Queen Ina’s Chicken Curry Salad.

For years, we tried to figure out how to make Gelson’s Chicken Curry Salad, and it wasn’t until one day that we saw watched Ina make her variation on The Barefoot Contessa that we realized how similar the two recipes were.

Chicken Curry Salad


What You Need

  • Sheet Pan
  • Blender/Food Processor
  • Mixing Bowl
  • Mixing Spoon

Ingredients 

  • 4 chicken breasts
  • 1 cup Mayonaise
  • 1/3 cup white wine (such as Sauvignon Blanc, Pinot Grigio, Pinot Gris, Pinot Blanc, Sémillon,)
  • 1/4 cup mango chutney (Mango Ginger from Trader Joe’s adds a nice bite)
  • 3 tablespoons curry powder
  • 1 1/4 cup celery (chopped)
  • 1/3 cup green onions (whole onion chopped)
  • 1/4 cup raisins (roughly chopped)
  • 1 granny smith (bite size pieces)
  • 1 red delicious (bite size pieces)
  • 1/4 cup shredded coconut (optional)
  • 1/4 cup cashew cashews (optional)
  • Kosher Salt
  • Pepper
  • Olive Oil

**Don’t cut the apple until just before you mix everything together, otherwise it will oxidize**

Step 1: 

Preheat the oven to 350°. While the oven is heating up, place the chicken on a sheet pan and rub with olive oil. We use garlic olive for more flavor. Sprinkle generously with kosher salt and pepper. If you’re doing bone in chicken, cook for about 40 minutes.

If using boneless and skinless, cook for about 20 to 25 minutes. When chicken is cooked, let cool and then cut into bite sized pieces. Obviously, remove the bones and skin, if using bone in chicken.

Chicken Curry Salad

Chicken Curry Salad

Chicken Curry Salad

Step 2: 

In a blender place mayonnaise, wine, chutney, curry and a sprinkle of salt. Blend until smooth.

Chicken Curry Salad

Chicken Curry Salad

Chicken Curry Salad

Chicken Curry Salad

Chicken Curry Salad

Chicken Curry Salad

As usual, our kitchen helper Peaches was envious of all the food.

Step 3:

In a bowl, mix a little of the dressing with the chopped chicken. Chop the apples and mix them in. Add the celery, green onions and raisins. Mix together, adding a little more dressing. Dress to your liking, you don’t need to use all the dressing if you don’t want to.

Chicken Curry Salad

Chicken Curry Salad

Chicken Curry Salad

Chicken Curry Salad

Chicken Curry Salad

You can also use Golden Raisins (chopped slightly)

Chicken Curry Salad

Step 4: 

Refrigerate until chilled, this really allows the flavors to develop.

Chicken Curry Salad

Classic Rosemary Chicken Salad

There’s nothing worse than a boring and flavorless chicken salad, but have no fear, you won’t find that here! This recipe is the perfect balance of chicken to mayonnaise, not to creamy but not to dry either. It’s the perfect balance.

Did you know that the first noteable chicken salad consisted of leftover chicken, mayo, tarragon and grapes? Yeah, we didn’t either, but it sounds good, except the tarragon, we’re rosemary girls ourselves.

Anyways, this first chicken salad was made by the owner of a meat market, Liam Gray in 1863. He was so successful that he turned his meat market into a deli.


What You Need

  • Sheet Pan
  • Mixing Bowl
  • Wooden Spoon

Ingredients 

  • 4 chicken breasts (boneless and skinless)
  • 1/2 cup mayonnaise
  • 2 tablespoons lemon juice
  • 1 cup celery (chopped finely)
  • 1 whole shallot (chopped finely)
  • 1 1/2 tablespoons dijon mustard
  • 2 tablespoons rosemary (chopped)
  • 1 tablespoon parsley (chopped)
  • Kosher Salt
  • Pepper

Step 1:

Preheat oven to 350°. Place chicken on a sheet pan and drizzle with olive oil. Rub all over the chicken, then sprinkle generously with kosher salt and pepper. Bake for 20 to 25 minutes. Remove from oven. When chicken is cool enough to handle, cut into bite size pieces and set aside. You can put the chicken into the freezer for five minutes, or in the fridge until ready to use.

Classic Rosemary Chicken Salad

Classic Rosemary Chicken Salad

Classic Rosemary Chicken Salad

Classic Rosemary Chicken Salad

Classic Rosemary Chicken Salad

Step 2: 

In a mixing bowl, whisk the mayonnaise, mustard, and lemon juice together. Season with pepper.

Classic Rosemary Chicken Salad

Classic Rosemary Chicken Salad

Classic Rosemary Chicken Salad

Classic Rosemary Chicken Salad

Step 3: 

Add the chicken to the dressing, mix in the shallots, parsley, rosemary, and celery.  Mix until combined. Taste and season with salt and pepper to your liking.

Classic Rosemary Chicken Salad

Classic Rosemary Chicken Salad

Classic Rosemary Chicken Salad

Classic Rosemary Chicken Salad

DSC_0397

Peepers

Peaches is totally into this Chicken Salad.

Christie’s Quick, Easy, and Healthy Turkey Burger

Like leftover rice, we sometimes buy too much of something. In this case, we were on a ground turkey kick (gobble gobble)  and this turkey needed to be cooked. So we made turkey burgers, and they were awesome! We obviously want to share our wonderful recipe with you!


Ingredients 

  • 1lb ground turkey
  • 1 half of a red onion
  • 2 tablespoons dijon mustard
  • worcestershire
  • 2 tablespoons garlic powder
  • 1 tablespoon onion powder
  • 1 tablespoon sprinkle of bread crumbs
  • salt
  • pepper
  • oil (coconut, olive, canola)

Step 1: 

Chop the red onion in fine dice and place in a mixing bowl. Add the turkey meat, and season with salt, pepper, garlic powder, and onion powder.

Step 2: 

Gently mix ground turkey meat, seasoning, mustard, a few sprinkles of worcestershire, and red onions together. Until the meat breaks down. But don’t overwork the meat. That tends to make the meat tough when cooking.

Step 3:

Sprinkle in some breadcrumbs, start with 1 tablespoon. This will help bind the burger together. You don’t want it too moist, or too dry.

Step 4: 

Dived the meat into four 4oz patties. Place a saute pan on the stove turn on heat to medium high. Coat the bottom of the pan with the oil of your choice, wait until the pan and oil are hot. Place the patties in the pan and cook for 3 to 4 minutes on the first side. Flip and repeat on the other side until internal temperature reads 165°.

Step 5: 

Serve over mixed greens with your favorite dressing (we used a honey mustard dressing…yum) and enjoy!


Christie's Quick, Easy, and Healthy Turkey Burger

Zucchini and Onion Rice Bowl

So we all know, that when we order Chinese food, no matter what you order, they always give you a ton of rice. More rice than anyone can eat in one sitting, and today’s recipe  utilizes all that extra rice we have sitting in our fridge.

And like most of our recipes, the amount of zucchini, onions and rice is subject to change on how many people you plan on feeding. You can also make this with fresh rice, I did for lunch yesterday and it was delicious!

Zucchini and Onion Rice Bowl


Zucchini and Onion Rice Bowl

Ingredients 

  • Left over rice
  • 1 to 2 zucchini’s(sliced to half moons)
  • 1 Onion (sliced)
  • Soy Sauce
  • Olive Oil

Step 1:

In a non sauté pan, heat 1 tablespoon of olive oil over medium heat.

Zucchini and Onion Rice Bowl

Zucchini and Onion Rice Bowl

Slice the Zucchini into half moons and the onions into slices.

Zucchini and Onion Rice Bowl

Step 2: 

When the oil is hot, add onion and zucchini and a splash of soy sauce. Stir until zucchini and onion soften. Add a couple more dashes of soy sauce to season. You can also add fresh ground pepper to taste.

Zucchini and Onion Rice Bowl

Zucchini and Onion Rice Bowl

Zucchini and Onion Rice Bowl

Zucchini and Onion Rice Bowl

Step 3: 

Just before the zucchini and onions are done cooking, add the rice, and a few more dashes of soy sauce to season the rice. Stir until combined and cover until rice is warmed. Remove from heat, and enjoy!

Zucchini and Onion Rice Bowl

Zucchini and Onion Rice Bowl