Ginger Crinkle Cookies

DSC_0939

Ginger Crinkle Cookies

Today on the blog we have another delicious cookie that can be made for Old Saint Nick or Chanukah Harry. This recipe comes straight from my (Marlee) Grandma’s recipe box and we’ve take this old tasty classic and updated it just a smidge.

While using dried ginger is totally okay, using additional fresh ginger really gives these ginger crinkle cookies and extra kick of awesome and punch of flavor that they were missing.

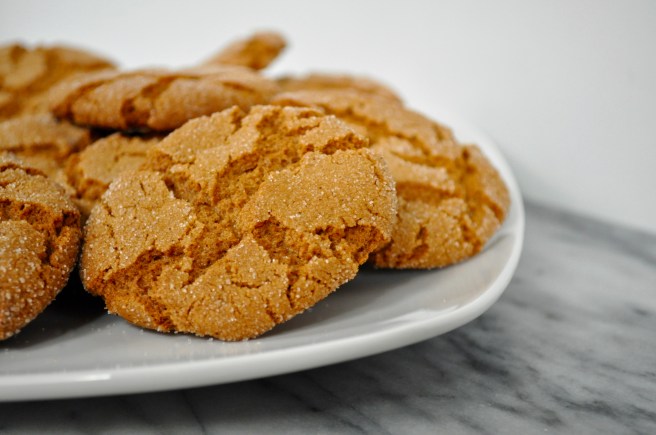
Like our sugar cookies, the longer you bake these, the crispier they turn out. We prefer these cookies to be a little softer and more chewy, so we just bake them for less. And while the cookies turn out crispier, they aren’t hard to eat and the inside is still slightly chewy. Weird, yet delicious.

This dough is super easy to make and fun for the the whole family. As a child, I fondly remember making these with my Grandma Alyce and Grandpa Fred.

Auntie Alyce’s Ginger Crinkles 

Ingredients 

  • 2/3 Cup Vegetable Oil
  • 1/2 Cup Dark Brown Sugar*
  • 1/2 Cup White Sugar*
  • 1 Large Egg
  • 5 Tablespoons Molasses
  • 1 Tablespoon Fresh Ginger (Heaping)
  • 2 Cups AP Flour
  • 1/2 Teaspoon Salt
  • 2 Teaspoons Baking Soda
  • 1 Teaspoon Cinnamon
  • 1/2 Teaspoon Ginger (Dried)
  • 1/2 Teaspoon Cloves
  • 1 Tablespoon Pumpkin Pie Spice
  • 1/4 Cup White Sugar

Step 1: 

Preheat your oven to 350°F and line a cookie sheet with parchment paper.

Step 2: 

In a medium bowl, using a hand mixer, mix together the vegetable oil and sugars.

Ginger Crinkle Cookies

Ginger Crinkle Cookies

Step 3: 

Next, add the egg and beat it in until combined.

Ginger Crinkle Cookies

Step 4: 

Stir in the molasses and fresh ginger and set the mixture aside.

Ginger Crinkle Cookies

Ginger Crinkle Cookies

Step 5: 

In a bowl, sift together the flour, salt, baking soda, cinnamon, dried ginger, and cloves.

Ginger Crinkle Cookies

Step 6: 

In two batches, add the flour mixture to the oil mixture. You can start with a wooden spoon and then move to your hands. Knead the dough until all the flour is combined.

Ginger Crinkle Cookies

Ginger Crinkle Cookies

Ginger Crinkle Cookies

Step 7: 

In a small bowl, combine the white sugar and pumpkin pie seasoning.

If you don’t have pumpkin pie seasoning, you can totally substitute it for cinnamon.

Step 8: 

For the rolling process it’s really about preference and what size cookie you like. We went for just about a tablespoon of dough, which you roll into a ball and then roll in the cinnamon sugar.

Line up the ginger dough balls, and bake for 7 to 9 minutes. If you like crispier cookies (like Auntie Alyce did) bake them 11-13 minutes.

Ginger Crinkle Cookies

Ginger Crinkle Cookies

Ginger Crinkle Cookies

Step 9:

Remove the cookies from the oven and transfer to cooling rack. Repeat Step 8 until all the dough is baked.

Ginger Crinkle Cookies

Ginger Crinkle Cookies

Ginger Crinkle Cookies

Ginger Crinkle Cookies


**If you want a softer chewier cookie do a full cup of brown sugar and exclude the white sugar. The dough will be super sticky, so add an extra tablespoon or so of flour and continue. Just be aware it won’t make the same dough as pictured!

Vanilla Bean Sugar Cookies

DSC_0843

Vanilla Bean Sugar Cookies are the perfect cookie to make for the Jolly Old Man who makes his way down your chimney every year. Wow, that’s super creepy when you say it out loud.

Either way, these cookies are super easy to make and are fun for the whole family to make! And these are the perfect cookie to decorate with family and friends. If you plan on decorating with frosting, you can leave off the optional glaze at the end.

Vanilla Bean Sugar Cookies

Vanilla Bean Sugar Cookies

Ingredients:

  • 1 Cup butter, softened
  • 1 Cup granulated white sugar
  • 2 Teaspoons vanilla paste or extract
  • 1 egg
  • 2 Teaspoons baking powder
  • 3 Cups AP flour
  • 1Teaspoon Salt

Step 1:

Preheat oven to 350.

Step 2:

In a mixer (or bowl with a hand mixer) cream softened butter and sugar until smooth and fluffy.

Step 3:

Crack egg into measuring cup and lightly beat, add vanilla into the egg, then add both to the mixer.

Step 4:

In a medium bowl, add flour, baking  and a dash of salt. Mix together and add a scoop at a time until it’s all incorporated.

Step 5:

Divide dough into four, then begin to roll it out. Roll out to desired thickness.

Thinner and the cookies will be crispier; thicker and they’ll be chewier.  We settled on 1/4 of an inch.

Another tip, if you let the dough sit for thirty minutes before rolling the cookies will be a crispier as well, and if you roll immediately they will be softer and more chewy. We’ve made these a couple of times, and the results have varied, but the taste is always delicious!

Vanilla Bean Sugar Cookies

Step 6:

Bake for about 7 minutes.

Step 7: 

Remove from the oven and allow to cool.

Optional Glaze: 

Combine the juice of half a lemon, about a cup of powdered sugar (sifted), a tablespoon of vanilla bean paste (or extract), and a splash of half and half.

Mix the ingredients together till it forms a delicious glaze. Adjust to your liking and desired to consistency. It’s really about what you like, like lemon? Add more lemon. Don’t like vanilla (craaazy!) take out some vanilla.

You get the idea! Mix and match, and if it’s too thick, had more half and half or lemon juice!

Vanilla Bean Sugar Cookies

Vanilla Bean Sugar Cookies

Vanilla Bean Sugar Cookies

Basic Pie Dough

piedough

Basic Pie Dough

It’s Fall! And you know what that means? It’s PIE SESON! But if you asked us at anytime during the year, we would say it’s always pie season. It just depends on what you fill the pie with.

We have tons of recipes we want to share with you, but first we have to go back to the basics. We’ve always had a hard time with dough, especially pie dough. Most of the time it’s too crumbly and breaks apart and we end up using a pre-made crust.

And remember there is nothing wrong with using a pre-made pie crust, our personal favorite is Marie Callendars, and we always have one in the freezer for pie emergencies.

But this year is the year we decided that we were going to conquer pie crust, and we have. We fell that when you can roll the pie crust onto your rolling pin, you’ve achieved greatness. And this recipe is super simple, and one of the best we’ve found. It’s actually foolproof. If we can do it, so can you! Remember the trick is cooled flour and cooking utensils which lead to the most perfect, buttery, awesome pie dough.

Basic Pie Dough

Ingredients 

  • 12 oz. AP Flour (Chilled)
  • 1 Teaspoon Fine Salt
  • Two 4 oz Sticks of Butter (8 oz total)
  • 1/2 Cup COLD Water

Step 1: 

First things first, put your pastry cutter (or fork) and rolling pin in the freezer! Sounds weird, but it’s important!

Step 2:

Next, measure out your flour and place that in the fridge as well. Then, take your butter, cut it into medium sized cubes and place in the fridge.

Let cool for at least 15 minutes. You want the flour and the butter to be really cold!

Step 3: 

When everything is good and cool, remove the flour from the fridge and mix in the salt. Stir till combined.

Step 4: 

Next, add the cubed butter and using your cold pastry cutter (or fork) cut the butter into the flour mixture. Work the flour and butter until the pieces look no smaller than peas.

Basic Pie Dough

Basic Pie Dough

If it’s too hot, but the mixture back in the fridge and then continue working.

Step 5: 

Add the cold water to the flour and butter mixture. First using the pastry cutter to combine everything. Once it starts to form a ball you can use your hands. Make sure there are no “dry patches” or crumbly bits, if needed add an extra splash of water.

Basic Pie Dough

Basic Pie Dough

Try not to overwork the dough, because if you do, you break the butter down.

Step 6: 

Once a dough has formed, divide the the dough into two balls. Ours measured out to about 11.5 oz (give or take). Wrap the dough balls in plastic wrap and refrigerate for at least an hour.

Basic Pie Dough

If you want, you can freeze them for future use.

Step 7: 

Once the dough is chilled, flour your surface and rolling pin. Gently roll the dough out, working from the middle out. Once the dough is rolled, roll it on to your rolling pin and place on your pie dish. Trim the edges.

Basic Pie Dough

Basic Pie Dough

Basic Pie Dough

Recipes Adapted from Saturday Evening Post and The Professional Chef