Beef Wellington

Not only is Valentine’s Day on Tuesday, tomorrow is Galentine’s Day and we can’t think of a better recipe to not only impress your beau but you can impress your Gal-Pal’s with this wonderfully delicious and mouthwatering recipe.

This recipe comes from the Hell’s Kitchen Cookbook that we adapted for TYL. One thing about us, besides our love for Gilmore Girls and TV, we LOVE cooking shows (obviously), especially shows that involve Gordon Ramsay (yum). When we were in film school, our dear friend CJ, told us we had to watch Hell’s Kitchen. At that time, we knew of Gordon Ramsay but didn’t know much more than he was British, was a chef, and liked to yell. We weren’t sure if we were going to enjoy watching but once we started, we were hooked.

We not only watched all of the  Hell’s Kitchen that Hulu had to offer, but every Gordon Ramsay show we could stream. We truly LOVE Gordon Ramsay especially his insults, specially when he calls people a donut or a donkey.

But if you watch enough Hell’s Kitchen, you see the same recipes made over and over and one of those recipes happened to be Beef Wellington. We didn’t know much, other than it seemed complicated, made Gordon yell at you if it wasn’t cooked right, and it looked freakin’ delicious. When we realized that Gordon had a steak house in Las Vegas, and they severed Beef Wellington, we booked our hotel and drove to Vegas to have one of the most amazing meals we had had in our adult lives. The years passed, and we kept saying, that we were going to learn, but we never did. And finally last Christmas, we decided Christmas Beef Wellingtons would be the perfect main dish for our holiday celebrations. After testing it three times, we finally figured it out. We think Gordon would have been proud of our determination!

And while this recipe can seem tedious and time intensive it’s totally worth the time and effort because the results are mouthwatering. It’s one of those recipes that once you learn it, you could almost do it without a guide. Its not so much about the measurements, its all in the feeling.

We guarantee if you make this for your significant other, you’ll definitely be getting some lovin’. Maybe find a use for any leftover blackberry sauce? Too dirty? Maybe, but you haven’t tasted this sauce. It’s so good, that just typing/thinking about it makes our mouths water.

Also, if you really want to get into the Valentine’s Day Mood, check out friend CJ’s band, The Summit. They just covered a sexy song from the Fifty Shades of Grey soundtrack that you can definitely listen to while eating our Beef Wellington.

Continue reading

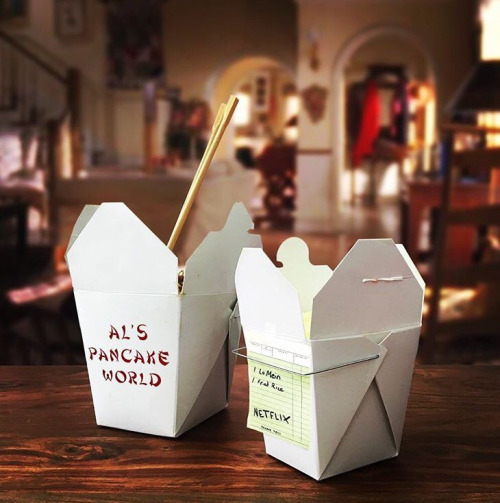
Al’s Pancake World Vegetable Fried Rice

One thing about us is we love TV shows. I mean, we went to film school so while others watch shows and movies passively we LOVE to watch and analyze and see things that other viewers might miss. And of of our favorite shows is Gilmore Girls, a few months ago we actually were lucky enough to test a recipe from the Unofficial Gilmore Girls Cookbook. We made Mock Turtle Soup  and really enjoyed all the Gilmore Girls inspired recipes.

As we continued re-watching the series in preparation for the Revival that premiered in November, we thought about all the different restaurants that were available in Stars Hollow and which ones we wanted to eat at and the consensus was Al’s Pancake World. Where no pancakes are ever served, just delicious foreign eats from around the world. And when we saw one of the teaser pictures that the Gilmore Girls Instagram account posted, we knew we needed to make our own version of Fried Rice

tumblr_oa83jnroqd1v9q6d5o1_500

We love signs and if this picture wasn’t a sign to make fried rice, I don’t know what is. What’s great about this recipe is that we think just about anyone could make it. Even the Lorelai’s and Rory’s of the world who fear the kitchen and all it’s tools, this recipe is pretty easy and almost impossible to mess up.

While we made our own rice for the recipe you can totally use left over white rice that you get from Chinese restaurants that you usually have no idea what to do with days later. You can also utilize whatever frozen vegetables or left over meat you have in the fridge (beef, pork, chicken…yum).

tumblr_lhz1lqhkmc1qe0tgxo1_r1_500

Forgive us, we just watched Mulan over the weekend and can’t stop singing all the songs.

Anyway, this recipe is super easy and we think that even Lorelai Gilmore could make it with ease. And while ours is called vegetable fried rice, you can add just about any kind of meat you want. Or leave it as is. We think that Al from Al’s Pancake World would definitely approve.

Click below for the recipe!

Continue reading

Nanaimo Bars

Nanaimo Bars

Hello loyal and wonderful followers! We are back! And this time, we mean it. We’ve been making a lot of changes to TwoYoungLadies and trying to figure things out and stock pile as many wonderful recipes as we could before we came to you! And there is no better time like CANADA DAY to come back and share a recipe with you.

Today (or tomorrow’s) recipe is for one of Canada’s delicacies, or so says Wikipedia, Nanaimo Bars! These bars originated in Nanaimo, British Columbia in 1953 and  the first time they ever appeared was in a recipe in the Vancouver Sun under the name “London Fog Bar”. Later that same year, they appeared Edith Adam’s 14th Edition Prize Cookbook.

Apparently the Nanaimo Bar is one of Canada’s most popular desserts and is notoriously and coylingly sweet. We made a few adjustments to our Nanaimo Bars so you’re not punched in the mouth with an overly sweet dessert. Our bars, have the perfect balance of sweetness and _______insert something.

Our bars are the perfect treat for any Canada Day Party and will leave you wanting more.


Nanaimo Bars

Nanaimo Bars

Nanaimo Bars

Nanaimo Bars

Bottom Layer

  • ½ cup of European-style butter
  • ¼ cup of sugar
  • 5 tablespoons of dark cocoa powder
  • 1 egg, beaten
  • 1 ¼ cup of graham cracker crumbs
  • ½ cup of almonds, finely chopped
  • 1 cup of shredded sweetened coconut

Step 1: In a double boiler, melt butter, sugar and coco powder until smooth.

Nanaimo Bars

Nanaimo Bars

Step 2: Add in the beaten egg and mix. (if the mixture starts “breaking”, then add a little cream/milk and mix until smooth again. It will have a slight gelatinous nature. Take off the heat and put into a bowl to cool.

Nanaimo Bars

Step 3: Into the chocolate bowl, add the graham crackers, almonds and coconut. Mix until everything is evenly distributed.

Step 4: Press firmly into a parchment lined 8”x 8” pan. Later, the parchment helps in releasing the sugary beautiful from it’s prison when it’s all set up.

Nanaimo Bars

Middle Layer

  • ½ cup of salted butter
  • 3 tablespoons of heavy cream
  • 2 tablespoons of vanilla custard powder (Jello Cook & Serve is perfect)
  • 2 cups of powdered sugar
  • 1 teaspoon of maple extract

Step 1: Cream the butter, cream, vanilla custard powder, and maple extract.

Step 2: Add the powdered sugar, a cup at a time to avoid Sugar Storms!  Combine until it’s lightened in color a little.

Nanaimo Bars

Step 3: Spread on the bottom layer and let it firm up in the fridge for 20 minutes.

Nanaimo Bars

Nanaimo Bars

Nanaimo Bars

Top Layer

  • 6 to 8 oz. of semi-sweet chocolate
  • 2 to 4 tablespoons of butter
  • ½ teaspoon espresso powder

Step 1: In the double boiler, melt the butter, espresso powder, and chocolate until melty and shiny. Let it cool slightly. It should still be pourable, but you don’t want it to melt the middle layer.

Step 2: Smooth the chocolate over in an even layer and place back into the fridge to firm and chill.

Cut and serve! While our bars make look big (for photo’s purposes) you can cut your bars into smaller or even bite size pieces!

Nanaimo Bars

Nanaimo Bars

Nanaimo Bars


P.S. We we’re inspired to make these while watching Schitt’s Creek a couple weeks ago.  Eugene Levy and his son Daniel Levy created a hilariously smart small town world that includes the genius of Catherine O’Hara.  If you have a sense of humor and breathe air, please watch it! You won’t be sorry!

For our American friends: CLICK HERE

For our Canadian friends: CLICK HERE

600x600bb-85


Traditional Tiramisu

Tiramisu trifle

Tiramisu trifle

Traditional Tiramisu

Hello All! It’s February! We have a lot of big things in the work, and we once again apologize for the lack of updates and recipes. But trust us, big things are coming. We have a lot in the works, and are working to make everything come together so we can share and grow Two Young Ladies.

But let’s get on to the good stuff.  Recipes! And today’s recipe is not only one of our favorites, it’s a real crowd pleaser. The recipe actually comes from our travels overseas two years ago to Europe. We started in Italy (Venice, Florence, Rome), then went to Barcelona, and ended up in London.

During our time in Rome, we went to the cutest little restaurant near the Catacombs. And while we were there with our tour group, we had the most amazing Tiramisu. And after a little sweet talking, we were able to get a general idea of what the recipe was, and now we’re able to share it with you.

While we chose to make our Tiramisu into a trifle, you’re more than welcome to make it in the traditional form. Either a 8×8 pan or 13×9 pan, it’s really up to you and how your want to layer it and how much you have. You can even do it in individual cups to be fancy!

Traditional Tiramisu

Traditional Tiramisu

Here’s a photo of us, in Roma, with our tour director, Andrea. We love him, and hope to go back to Italy to see him soon!

Roma

Tiramisu

Ingredients

  • 2-223g containers of Mascarpone
  • 6 eggs (yolks and whites separated)
  • 2-3 packages of lady fingers
  • 4 tablespoons sugar
  • 4 tablespoons unsweetened cocoa
  • brewed espresso (1 1/2 cup or 12 oz. water and 2 tablespoons of ground espresso)
  • 2 oz Kaluha

Step 1:

Leave Mascarpone out to come to room temperature, completely.

Tiramisu trifle

Step 2:

Then brew espresso and let it cool. When cool add a tablespoon of cocoa and 2 oz Kaluza. Mix and set aside.

Tiramisu trifle

Tiramisu trifle

Step 3:

Separate the eggs into different bowls. One of whites and one for yolks.

Tiramisu trifle

While separating eggs in the egg shell looks pretty (cause all the pros do that way) we recommend separating with your hands. SO. MUCH. EASIER.

Step 4:

In a stand mixer fitted with the whisk attachment, put in your egg whites and whisk on a medium speed. When the whites start to stiffen, add a tablespoon of sugar, and continue to beat until stiff peaks. Do NOT OVER BEAT.

Tiramisu trifle

Tiramisu trifle

Another tip, a lot of recipes says it only takes “a minute or so” for the egg whites to whip up, we think it depends on the machine. Our stand mixer definitely takes at least five minutes to get to stiff peaks. Don’t be alarmed if it doesn’t happen right away.

Step 5:

While the whites are working, whisk the egg yolks until their air rated. Add the remaining 3 tablespoons of sugar to the yolks and whisk until it’s fluffy.

Step 6:

To the yolk mixture, add the mascarpone and incorporate it with the yolks and sugar. Let it be creamy. Add vanilla.

Tiramisu trifle

Tiramisu trifle

Step 7:

Fold egg whites into mascarpone/yolks mixture. Be gentle. It’s best to fold the whites into the mixture in thirds.

Tiramisu trifle


Tiramisu trifle

Step 8:

In a shallow baking dish, put the espresso/cocoa/kaluha mixture. Lightly dip the lady fingers in. Don’t get too wet otherwise it will disintegrate.

Tiramisu trifle

(We apologize for the blurry photos, we’re still figuring out not only our new camera, but the lighting in our cave like apartment)

Step 9:

Layer lady fingers, fluffy creamy mixture and repeat.

Tiramisu trifle

Tiramisu trifle

Step 10:

Dust unsweetened cocoa over the top. Serve and enjoy!*

Tiramisu trifle

Tiramisu trifle

Traditional Tiramisu

Traditional Tiramisu

*For this particular recipe, we choose to make a simple whipped cream, and make that the last layer/topping. You’re more than welcome to do that, or leave it and serve it the traditional way.

Chicken and Asparagus Stir Fry

Chicken Asparagus Stir Fry

Happy Monday! You know what the best way to start your Monday off is? With our Chicken and Asparagus Stir Fry Bowl. This is the perfect meal after a weekend of fun, and questionable food choices. This bowl is packed full of flavors and will keep you going for hours!

Sriracha, agave, and soy give this bowl an extra punch of flavor that really makes in unique and special. Give this tasty bowl a try and let us know what you think here or using the hashtag #twoyoungladies

Chicken and Asparagus Stir Fry

Chicken and Asparagus Stir Fry

Chicken and Asparagus Stir Fry

Chicken and Asparagus Stir Fry

Ingredients

  • 2 Tablespoons Soy Sauce
  • 2 Tablespoons Agave
  • 2 Tablespoons Sriracha
  • 1 Teaspoon Crushed Red Peppers
  • 2 Boneless, Skinless Chicken Breasts
  • 2 Tablespoons Olive Oil,
  • 1 Bunch Asparagus (Trimmed and Cut to bite sized pieces)
  • 4 Teaspoons Garlic (Finely chopped)
  • 1 Teaspoon Toasted Sesame Oil

Chicken and Asparagus Stir Fry

How beautiful is this asparagus? We love asparagus!

Step 1:

In a small bowl, mix the soy sauce, agave, sriracha, and red pepper flakes.

Step 2:

Cut the chicken into bite sized pieces, and place in a large bowl or ziplock bag.

Chicken and Asparagus Stir Fry

Step 3:

Cover the chicken with about half of the soy mixture. Reserve the rest. Cover the chicken and sit in the fridge for at least thirty minutes (the longer the better) for the flavors to meld.

Chicken and Asparagus Stir Fry

Step 4:

Twenty minutes before you plan on cooking dinner, remove the chicken from the fridge.

Step 5:

In a large skillet, heat 1 tablespoon of the olive oil over a medium high heat. Saute the asparagus and saute until just under done, you don’t want to over cook them. Remove the asparagus from pan. About two to three minutes.

Chicken and Asparagus Stir Fry

Step 6:

Add the remaining oil, and cook the chicken pieces until almost cooked completely through, which is about five minutes.

Chicken and Asparagus Stir Fry

Chicken and Asparagus Stir Fry

Step 7:

Add the chopped garlic, and saute for about 60 seconds. Add the asparagus back into the pan, and the reserved marinade. Cook for another two minutes and just before you take it off the heat, add the 1 tablespoon of toasted sesame oil.

Chicken and Asparagus Stir Fry

Chicken and Asparagus Stir Fry

Serve immediately over rice and top with toasted sesame seeds.

Chicken and Asparagus Stir Fry

Chicken and Asparagus Stir Fry

Chicken and Asparagus Stir Fry

Classic Chimichurri

Classic Chimichurri

Today’s recipe is a chimichurri which is traditionally a green herb sauce to serve over grilled meat. The recipe origins can be traced back to Rio de la Plata, Argentina. Traditionally, chimichurri is made by blending parsley, garlic, mint, and oregano with oil.

Before we made this recipe, we totally thought the main green herb in this dish was cilantro but after doing some research, we realized that cilantro is the last thing that would be put into this wonderful dish, and for that we are thankful! Because, if you didn’t know you know now, we really dislike Cilantro. Christie HATES it, and Marlee (me) strongly dislikes it.

A few Sunday’s back we invited our friend Claudia over dinner, and we asked her if she could have anything for Sunday dinner, what would it be. And this is what she wanted. We were a little nervous making something we’d never made before*, but then we realized, it’s just like making pesto! You allow the food processor to do all the work, and all you really have to do is season the meat, and it cook it.

*According to Christie, after proofreading this, she informed me that we actually did make a chimichurri sauce once before but she refused to eat it because there was cilantro in it. I personally don’t recall this memory, but that’s okay. Enjoy our recipe! And remember there is nothing to be afraid of in the kitchen, except maybe the garbage disposal. Those are scary.

Classic Chimichurri

Classic Chimichurri

Classic Chimichurri 

Ingredients

Chimichurri 

  • 2 Cup Flat Leaf Parsley (Fresh)
  • 1 Cup Mint Leaves (Fresh)
  • 1 Cup Oregano Leaves (Fresh)
  • 1 Cup Garlic Olive Oil
  • 4 Teaspoons Red Pepper Flakes
  • 16 Cloves Garlic
  • 2 Pounds Skirt Steak

Dry Rub 

  • 2 Tablespoons Oregano Leaves (Dried)
  • 2 Tablespoons Basil Leaves (Dried)
  • 1 Tablespoon Parsley Flakes (Dried)
  • 1 Tablespoon Thyme Leaves (Dried)
  • 1 Tablespoon Kosher Salt
  • 1/2 Tablespoon Freshly Ground Pepper
  • 1/2 Tablespoons Smoked Paprika
  • 2 Teaspoons Garlic Powder
  • 1 Teaspoon Onion Powder

Step 1: 

For the dry rub, mix all the ingredients in a small bowl and set aside. How easy was that?

Step 2: 

In a food processor combine the parsley, mint, oregano, garlic, and red pepper flakes. Pulse until broken down, 2 to 3 pulses.

Step 3: 

Next add the olive oil and pulse until smooth.

Step 4: 

Using as much dry rub as you’d like, cover your your skirt steak with your dry rub. Make sure you massage it into your meat, you want that flavor to go everywhere.

Step 5: 

Next, add about half of the chimichurri sauce and massage that into the meat as well for maximum flavor.  Cover and refrigerate for at least four hours. Remove the meat about 30 minutes before you plan on cooking.

Step 6: 

You can either grill your meat on your grill or in a large skillet on the stove. We use a stovetop griddle that lays on top of the burners. Super helpful!

Okay, so turn your grill or pan to high heat and allow to heat for a few minutes. When your cooking device is good and hot, lay your meat down and cook for about 4 to 5 minutes per side.

Step 7: 

Allow the meat to rest for at least five minutes, and then cut the meat across the grain and serve with the rest of your classic chimichurri sauce.

Classic Chimichurri

(That lovely mouth you see is our friend Claudia, anxiously awaiting our food)

Classic Chimichurri