Classy Bolognese Sauce

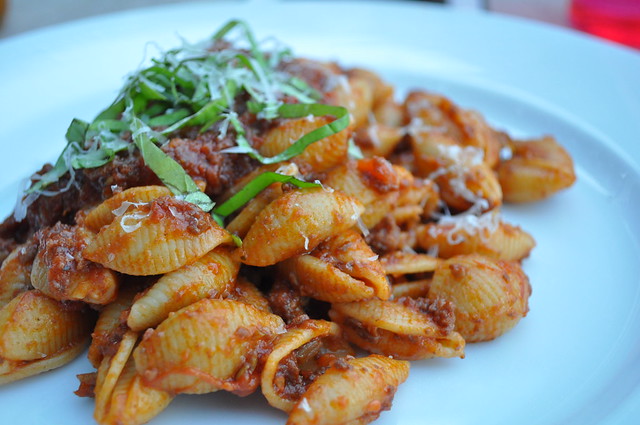
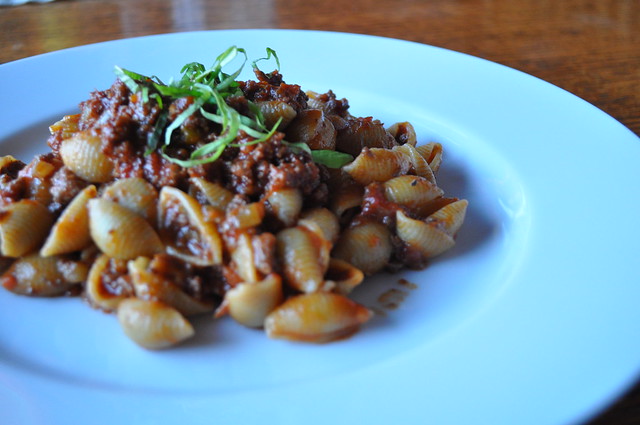
One of our favorite dishes to make is Pasta Bolognese. We can’t tell you how many times we’ve made different variations of this dish, but we never tire of making it. For the first time we made our own version of Pasta Bolognese. That’s right, no recipe. We just did it straight from our brains. And it turned out pretty fucking great.

This recipe is a no frills kind of recipe, just classically beautiful, like two young ladies should be!

Classy Bolognese 

Classy Bolognese

Classy Bolognese

Ingredients

  • 1 Shallot (finely diced)
  • 1 Cup Celery (About 4 Stalks, finely diced)
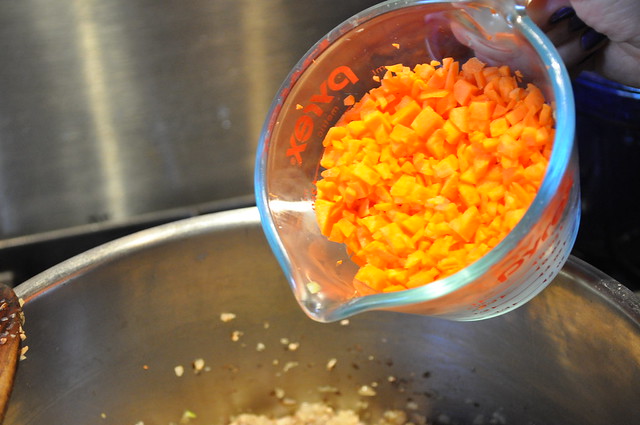
  • 1 Cup Carrots (3 Large, finely diced)
  • 1 Medium Onion (finely diced)
  • 1 Cup Baby Bella Mushrooms (About 9 mushrooms), finely diced)
  • Meat Trio 1lb Each (Beef, Pork, Veal, Italian Sausage, it’s really up to you which ones you use)
  • Garlic Olive Oil
  • 1 Tablespoon Butter
  • 1 Cup Red Wine
  • 2/3 Cup Whole Milk
  • 2 to 3 Tablespoons Tomato Paste
  • 1 28oz Can Crushed Tomatoes
  • 1 28oz Can Whole Tomatoes
  • 1/2 Teaspoon Baking Soda
  • 2 Basil Leaves ( Cut into Ribbons)
  • 1 Bay Leaf
  • 1 Teaspoon Onion Powder
  • 1 Teaspoon Garlic Powder
  • 1 Teaspoon Crushed Red Peppers
  • Few Chunks of a Parmesan Rind
  • 1 Tablespoon Garlic
  • Kosher Salt
  • Pepper

Classy Bolognese

Step 1: 

In a large pot, heat 2 tablespoons of garlic olive oil and one tablespoon of butter over medium-high heat.

Step 2: 

When the oil is shimmering add the diced onions, mushrooms and shallot. Sauté for two to three minutes.

See how the oil dances?

Classy Bolognese

Classy Bolognese

Classy Bolognese

Step 3: 

Add the carrots and sauté for another three minutes. Finally, add the celery and continue cooking for at least 1 minute.

Classy Bolognese

Classy Bolognese

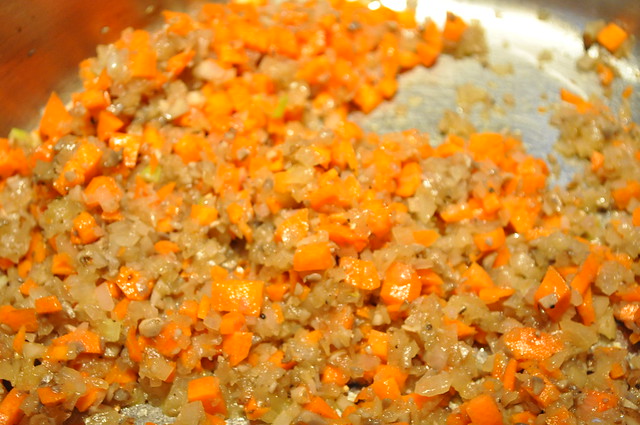
Celery has a lot of water, so adding it last is a must!

Classy Bolognese

Step 4: 

If needed, at a little more oil, and then add your Meat Trio. Season liberally with Kosher salt and pepper. Break and brown the meat until the meat is just barely pink.

Classy Bolognese

Step 5: 

Next, add your red wine and raise the heat to high. Cook until all the liquid has cooked off, about 3 to 5 minutes.

It’s okay if it takes longer, we all have different stoves, so don’t be alarmed!

Step 6: 

Once the wine has been cooked off, lower the heat to medium and add the milk. Cook until most of the liquid is gone, this can take anywhere from 20 to 40 minutes.

Classy Bolognese

Step 7: 

Add the tomato paste in and mix well.

Classy Bolognese

Step 8: 

If you haven’t, squish your whole tomatoes in a separate bowl, you can do it in the pot, but you run the risk of hot splatter, and we don’t think anyone wants that.

Pour your tomatoes in the pot and stir until combined. Add the 1/2 teaspoon of baking powder. At this point you can add a splash of red wine.

Classy Bolognese

Step 9: 

Stir in the basil, bay leaf, onion powder, garlic powder, parmesan rinds and red peppers. Taste and season accordingly, if it needs more salt or pepper or any seasoning…add it!

Lower the heat and cook un-covered for 1.5 hours.

Classy Bolognese

Step 10: 

After 1.5 hours of cooking, add 1 hearing tablespoon of chopped garlic. Continue cooking un-covered for 2 to 3 hours. Stir occasionally.

Again, at this point, taste and season accordingly. But go easy on the salt, the rinds have a really nice salty flavor, and release the salt flavor as they melt.

Step 11: 

During the last hour of cooking, you can slowly start to defeat your sauce. This step isn’t necessary but we always defat in the last hour.

Classy Bolognese

Step 12: 

When the sauce is ready, cook your pasta and toss the sauce and pasta together.

*We always reserve at least a cup and half of our pasta water (after the pasta is cooked, but before you drain) and use to toss with the pasta and the sauce.

Classy Bolognese

Classy Bolognese

Classy Bolognese

Strawberry Ice Cream

It’s Strawberry season! And what better way to utilize them then to make fresh Strawberry Ice Cream!

Look at how beautiful and plump those are!

Strawberry Ice-cream

strawberry ice cream

This recipe is the perfect fruity treat to cool you down on a hot summer day.

Ingredients 

  • 1 Can Sweetened Condensed Milk (14 oz)
  • 2/3 Cup Evaporated Milk (5 oz)
  • 2 Tablespoons of Sugar
  • 1 1/2 Teaspoons of Vanilla Extract
  • 1 Cup Strawberries Pureed
  • 1 Cup Half and Half
  • 1 Cup Whole Milk or Cream
  • 2 to 4 Drops Red Food Coloring (optional)
  • 1/2 Cup of very finely diced strawberries

Step 1: 

The first thing you want to do is chop and puree your strawberries and set aside in the fridge.

Strawberry Ice-cream

Step 2: 

In a bowl, mix together the condensed milk, evaporated milk, half and half, cream/whole milk, sugar, vanilla and strawberry puree. Mix until all the ingredients are combined.

No pictures, because no matter how much you photograph it, it still looks gross.

Step 3: 

Put in the fridge for at least thirty minutes. But you know how we feel, letting the base sit overnight always produces the best results.

If you’re in a pinch, place in the freezer for 25 minutes and stir occasionally.

Step 4: 

Finely dice your strawberries and sprinkle with a tiny bit of sugar, 1/2 teaspoon to 1 teaspoon should do it. We placed this in the freezer until we were ready to use them, but only put in the freezer while the ice cream is churning, you want them cool, not frozen! 

Step 5: 

When the base is cold, churn to your ice creams manufactures setting. For ours, we churn for about twenty minutes, and then during the last five minutes we add in our cooled strawberries.

Strawberry Ice-cream

Step 6: 

Transfer to a container and freeze for at least three hours before serving.

Strawberry Ice-cream

Strawberry Ice-cream

Victoria Sponge Cake

Happy Victoria Day! Today we made a Victoria Sponge Cake in honor of Queen Victoria.

Apparently (according to Wikipedia…) Queen Victoria used to love having a slice of sponge cake with her afternoon tea, and so today in honor of Queen Victoria and her afternoon sponge, we made you this classic and tasty dessert.

Victoria Sponge Cake


Victoria Sponge Cake 

Cake: 

  • 1 Tablespoon of Butter or Cooking Spray
  • 1 Cup Butter (Softened)
  • 1 Cup Sugar
  • 4 Large Eggs
  • 1 Tablespoon Vanilla Bean Paste or Extract
  • 1 Cup AP Flour (Sifted)
  • 1 1/2 Teaspoons Baking Powder
  • 1/2 Teaspoon Salt
  • Powder Sugar (Dusting)

Filling: 

  • 1 Cup Heavy Cream
  • 2 Tablespoons Powder Sugar
  • 1 Teaspoon Vanilla Extract
  • 1/2 Teaspoon Lemon Extract
  • 2/3 Cup of Good Quality Strawberry Jam
  • Fresh sliced strawberry

Step 1: 

Preheat your oven to 350°F. If using butter, melt over a low flame and brush the bottom of your two 8 inch round cake pans and line with parchment paper. If using cooking spray, spray the pans and set aside.

Step 2: 

In a large bowl or stand mixer fitted with a whisk attachment, beat together the  butter and the sugar until light a fluffy. Make sure to beat it well to ensure you get a lot of air into the batter.

Victoria Sponge Cake

Victoria Sponge Cake

Step 3: 

Next, beat the eggs in one at a time. It’s really important to beat the eggs in one at a time, and remember to scrape down the sides of the bowl between each egg. You want the batter to stay light and airy.

Victoria Sponge Cake

There is a possibility that the mixture may curdle, that’s okay, Just at 1 Tablespoon of AP flour. Don’t take from your other flour mixture though.

Step 4: 

Mix in the vanilla extract.

Step 5: 

In a small, separate bowl, sift together the flour, baking powder and salt.

Step 6: 

Fold the flour mixture into your wet ingredients. Don’t over mix!

Victoria Sponge Cake

Victoria Sponge Cake

Step 7: 

Equally divide the batter between the two greased cake pans. Spread them out evenly and tap them against the counter to get out all the air bubbles.

Victoria Sponge Cake

Step 8: 

Place the cakes in the oven and bake for 20-25 minutes. Remove from the oven and let cool in their pans for 5 -10 minutes. Remove from their pans and let cool completely for at least an hour.

Assembling the Cake 

Step 1: 

Once the cakes are cooled, place on our serving plate. Spread the jam on both sides of the cake. place about half the strawberries on top of the jam.

Victoria Sponge Cake

Victoria Sponge Cake

Victoria Sponge Cake

Victoria Sponge Cake

Step 2: 

In a medium bowl, beat one cup of heavy cream in on high. When the cream starts to take shape, mix in your powder sugars and both extracts. Beat to desired consistency

Step 3: 

Spread the whipped cream evenly over the strawberry and top with the rest of the strawberries. Sandwich the two cakes together and dust the top with powdered sugar.

Victoria Sponge Cake

Victoria Sponge Cake

Cut and serve.

Victoria Sponge Cake

Creamy Coleslaw

Happy National BBQ Day!

One of the best things about Barbecues, besides the meat, is the side dishes! We mean, you can’t really have a BBQ without side dishes, and one of our favorite BBQ sides is Creamy Coleslaw!

This recipe is  a classic and a definite crowd pleaser, and a must at any summer BBQ.

Creamy Coleslaw

Ingredients 

  • 1 Bag of Coleslaw Mix
  • 3/4 Cup Mayonnaise (We use the one made with Olive Oil)
  • 1/4 Cup Sugar
  • 1 Teaspoon Celery Seed
  • 2 Teaspoons Mustard Powder
  • 1/2 Teaspoons Cayenne Pepper
  • 3 Tablespoons White Vinegar
  • Kosher Salt
  • Fresh Cracked Pepper

Step 1: 

In a small food processor put the mayonnaise, sugar, celery seed, mustard powder, cayenne pepper and white vinegar and blend until smooth.

Step 2: 

Taste and season with kosher salt and pepper to your like. Blend for five more seconds.

Step 3: 

Place your coleslaw mix in a bowl and mix with some of your dressing. Toss until fully coated, serve almost immediately.

Personally we dress our coleslaw 10 to 15 minutes before we serve it, that way it lightly breaks down the coleslaw mix and it’s not too soggy.

Creamy Coleslaw

Smashed Potato Salad

Love potato salad, but hate all the mayonnaise? Then this recipe is for you! What’s great about this recipe is fact that you’re using the mashed potatoes as the creamy element. You can also add a dollop of sour cream, or even mayonnaise for extra creaminess. But it’s not needed!

Smashed Potato Salad


Ingredients

  • 3 Russet Potatoes
  • 3 Red Potatoes
  • 3 Yukon Potatoes
  • 1/2 Cup Celery (Diced)
  • 1/2 Cup Onion (Diced)
  • 2 Green Onions (Diced)
  • 2 to 4 Tablespoons Coleman’s Mustard (Or mustard of your choice)
  • Kosher Salt
  • Fresh Cracked Pepper
  • Garlic Powder
  • Onion Powder
  • Splash of Half and Half
  • 1 Tablespoon Butter

Step 1: 

Peel and chop all your potatoes and place them in cold salted water. Once chopped and peeled, put the potatoes in on the stove and bring to a boil. Cook until potatoes are fork tender.

Step 2: 

Before draining, reserve some starch water. Drain the potatoes.

Step 3: 

Return about half of the cooked potatoes to the pot and start mashing them. Add a splash of half and half and one tablespoon of butter. If you’re not feeling the half and half, use some of the reserved starch water. Because of the starch it helps thicken the potatoes but with half the calories!

Step 4: 

Season the mashed potatoes with some kosher salt, pepper, garlic powder, onion powder, and mustard. Mix well.

Step 5: 

Next, mix in the onions and celery.

Step 6: 

Finally, stir in the other half of the cooked potatoes. At this point, season to your liking. If it needs more mustard or salt add now. Can be served immediately, at room temperature or cold. It’s really up to you!

You can also add a dollop of sour cream and mix it in for added creaminess.

Smashed Potato Salad

Black Magic Brownies

These brownies will change your life, we’re not kidding. They’re so moist and chocolatey, and not overly sweet. When we make brownies we want to showcase the chocolate wonderfulness, so we use dark chocolate and coffee to highlight the chocolate flavor!

You can’t go wrong with these brownies, I mean, that’s why we call them MAGIC brownies. 😉

Black Magic Brownies


Ingredients 

  • 8 tbsp. unsalted butter, plus more for greasing
  • 1.5 oz dark chocolate powder
  • 1 oz milk chocolate powder
  • 3 tbs of espresso (if powder, prepare as instructed on container and then add 3tbs it or brewed)
  • 2/3 cup white sugar
  • 1/3 cup dark brown sugar
  • 2 eggs, beaten
  • 1 tsp. vanilla extract
  • ¼ cup flour
  • ¼ tsp. kosher or fine salt

Step 1: 

Heat oven to 325°. Grease an 8″ x 8″ baking pan with butter or baking Pam.

Step 2: 

Melt butter, then in a bowl, mix in chocolate and espresso. Stir until combined.

Step 3: 

Add sugars (brown and white), then add the eggs and vanilla. Mix with a wooden spoon until batter is smooth.

Step 4: 

With a rubber spatula, scrape batter into greased baked pan. Tap the pan on a hard surface a few times to release all the air bubbles. Doing this will create a smoother end result.

Step 5: 

Bake for 33-35 minutes or until toothpick comes out clean. But some crumbs are okay!

Black Magic Brownies

#TwoYoungLadiesTravel to Helena

We made it to beautiful Helena, Montana! We’ve decided for our drive home that we will make sure we don’t drive more than seven or so hours. After our Spokane to Edmonton drive, we realized as great as it is, we would rather enjoy the drive then wear ourselves down.

We left Calgary this morning and started our trek to Montana, but not before stopping at Dairy Queen for some soft serve. The past two times we went to Edmonton, all we wanted was a soft serve DQ chocolate dipped cone, and we FINALLY got one. Thankfully, we got one in Lethbridge, Alberta which was the last real town we passed through.

#TwoYoungLadiesTravel

After we left Lethbridge, we headed South towards Montana. As we drove further and further South, we realized we were the ONLY car on the road, besides the occasional truck heading in the opposite direction. Almost two hours of driving, and it was just us and the open road. Totally picturesque! It actually started raining as we got closer to the boarder; the perfect day for a drive.

#TwoYoungLadiesTravel to Helena

When we finally got to the boarder, we were so excited! We stopped inside the duty free store to buy Franny (Marlee’s mom) some more Coffee Crisps, and some other Canadian knick-knacks. Then we headed towards the boarder crossing. Thankfully there was only one car in front of us, and it took a total of ten minutes of waiting and talking to the border officer. We were so happy to be back in the United States!

#TwoYoungLadiesTravel

We weren’t sure what to expect because neither of us have ever been to Montana, but it was absolutely beautiful! The air was so clean and fresh. We stopped the car at a rest stop ( a really nice one) and walked around enjoying the air and the rain. The smell of fresh rain and pavement is oddly comforting.

Once in Montana, we were on the 15 South which is called the Lewis and Clark Trail. Kind of a cool freeway to drive on when you think of all the history. We actually stopped at a scenic overlook, and just took in all the nature. It was so silent, even with the random passing cars. It was wonderful! We were both blown away by how beautiful Montana is. Even in the car, we could’t stop saying how beautiful the scenery was. We think we’re still at a loss for words to truly describe it’s full beauty. We’re sorry if we’re redundant!

Don’t we take beautiful photos?

#TwoYoungLadiesTravel

Snoopy enjoying the scenery.

#TwoYoungLadiesTravel to Helena

So much beauty.

#TwoYoungLadiesTravel to Helena

We spent quite a bit of time discussing whether or not this was a mesa, plateau, or a butte. We think it’s a plateau or a mesa, which actually are kind of the same thing. But butte is more fun to say…because it sounds like butt. Obviously, you can guess who added that.

#TwoYoungLadiesTravel

When we finally got to Helena we were so excited to see that right next to our hotel was a supermarket! We immediately checked in, and walked across the street to find dinner that wasn’t fast food.

As you can see, we were very happy to be in a market with real food. We walked up and down every single aisle. It was heaven. We can’t wait to get home and start cooking and prepping our web series for you guys!

#TwoYoungLadiesTravel

More soon!

#TwoYoungLadiesTravel to Edmonton (then back to Calgary)

Greetings from Calgary!

For those of you following our road trip journey, we’re sorry we left you hanging after Spokane. When we left Spokane to drive to Edmonton and we’re expecting a nine hour drive. Well that didn’t happen. What we forgot to factor in was the fact that we entered MST and basically lost an hour, and we’d have to slow down to a snails pace when going through all those teeny tiny towns that no one’s ever heard of. The guys at the A&W we stopped at were THRILLED to see girls they weren’t related to. Sorry, but it’s true! haha.  So, instead of taking nine hours, our drive was a little over 12 hours. YIKES.

You can imagine we were going a little stir crazy by the end of the day. And once we got to Edmonton it was jam-packed with seeing family, and cleaning out storage units. We barely had time to think, let alone write about our journey! So here it goes:

The first part of the drive from Spokane to the Canadian boarder through B.C. was stunningly gorgeous. The mountains were absolutely beautiful and the air was so clean. As native Angelenos, we’re not used to such clean air, it was almost too much to handle!

After almost 6.5 hours of driving, we finally switched in Crowsnest Pass. By this time, we were both pretty worn-out but we knew we had to keep going. We read that there was SNOW(something us Cali Gals don’t know how to deal with) coming and we didn’t want to be caught in that.

So we kept going, and all of a sudden the the beautiful mountains disappeared and we were surround by flat, farmland, and a giant sky with nothing for miles. No offense to Alberta, especially the drive from Calgary to Edmonton, but jeez, it is sooooo boring. We were both nodding off, eek. Even driving from Edmonton to Calgary today, we were both zoning out and having a hard time staying awake and it was only 3ish hours. But now that we are in our very nice hotel in Calgary, we are able to sit, not talk, and enjoy mindless TV and writing.

Okay, back to our journey: As we were driving into Edmonton there wasn’t a cloud in the big sky! It was beautiful. We thought the weather man must have been crazy; how could there be the chance of snow? Well, we arrived in Edmonton at the Cedar Park Inn, and the temperature was MUCH cooler than we expected. But still, didn’t look like it was going to snow.

#TwoYoungLadiesTravel

(Does that look like snow to you?)

We went to sleep and the next morning we woke up to a freaking Winter Wonderland. Obviously, Edmonton didn’t get the memo that Spring was here. Our poor car, Snoopy, looked cold yet majestic in the snow. Probably the first and only time Snoopy will see snow.

#TwoYoungLadiesTravel

Here’s Snoopy, covered in Snow. In May. WTF

#TwoYoungLadiesTravel

A Winter Wonderland in May. Fun fact, minus this snow, Spring in Edmonton is basically Winter in LA.

#TwoYoungLadiesTravel

Look at all that SNOW!!!

#TwoYoungLadiesTravel

Two Young Ladies in the the Snow! Aren’t we adorable?

#TwoYoungLadiesTravel

Little flowers covered by snow.

Over the week, we met up with many family members and had tons of meals, including a daily trip to Tim Hortons for coffee and Tim-Bits. Now, we’re going to be honest, a lot of the area we were in is a food desert (basically meaning there is nothing but fast food around), we found a few places that we liked, Moxie’s and Earls, but who knows how healthy it was for you. We were talking about how almost everything comes with fries. We need some green veggies STAT!

Anyways, we had some good meals and discovered a few new awesome things like Sesame Steak Sauce. At first we were concerned when we saw this white steak sauce coming out at a BBQ, but everyone swore that it’s amazing, so we reluctantly put it on our plates to be polite, like our fellow Canadians. It was love at first taste! Holy Smokes! We would have licked it off the plate if no one had been looking at us (Christie tried). So we decided we have to make it, so stay tuned for that and many other inspirations we got from this trip, coming up in the next few weeks. We promise you that you won’t be sorry.

canada-sorry


UPDATE AS OF MAY 13

We’re heading back to the states today! Heading from Calgary to Helena, Montana! Canada it’s been real, but we will see you in a few months. Time to head back to the motherland!

Banana Oat Muffins

Finally! A non-lemon recipe! Today’s recipe comes from Running with Spoons, and we really, really, really, like this recipe. And it’s kind of healthy so that’s even more awesome.

There’s just something about the words: banana, chocolate and oatmeal that just sounds super comforting, and who doesn’t love healthy comfort food. These muffins are great for a quick morning breakfast or an afternoon snack.

Banana Oat Muffins


Ingredients 

  • 1 Cup Greek Yogurt (Plain)
  • 2 Very Ripe Bananas
  • 2 Eggs
  • 2 Cups Old Fashioned Rolled Oats (Quick is okay as well)
  • 1/4 Cup Dark Brown Sugar
  • 1 1/2 Teaspoon Baking Powder
  • 1/2 Teaspoon Baking Soda
  • 1 Cup Chocolate Chips
  • Cooking Spray

Step 1:  Preheat your oven to 400°, then line your muffin pan with your cupcake liners. Using your cooking spray, spray the inside of the cupcake liners. I know this step seems weird, but if you don’t, the muffins will stick to the liner. TRUST US. We missed this step the first time we made them. We suggest using Pam Baking, it smells tasty 🙂

Step 2:  Put the bananas, yogurt, eggs, oats, sugar, baking powder, and baking soda in a blender and blend until everything breaks down and is smooth. Banana Oat Muffins

Don’t be afraid of darker bananas! They have a wonderful banana flavor! Banana Oat Muffins Banana Oat Muffins Banana Oat Muffins Banana Oat Muffins Banana Oat Muffins Banana Oat Muffins Banana Oat Muffins Banana Oat Muffins

Step 3:  Pour the prepared batter into the cupcake liners. You can also sprinkle the tops of the muffins with more chocolate if you wish. Banana Oat Muffins

Step 4:  Bake for 15-20 minutes. The tops will be set and the toothpick will come out clean. These can be stored in an airtight container for up to a week. Banana Oat Muffins Banana Oat Muffins Banana Oat Muffins

Lemon Ice Cream

What’s this? ANOTHER lemon recipe? We’re sorry, but we bought so many Meyer Lemons we had to make as many recipes as we could.

Now here’s a fun story, after we made this and the ice cream was churning, we went to take a taste and realized we forgot to add sugar. So you could imagine our surprise when we went to taste it, and it was completely and totally bitter.

We added some bakers sugar, and it helped, but what we ended up having to freeze the ice cream, then let it melt completely and then re churn it. Despite our little flub, the ice cream was really quite delicious and we highly recommend this recipe.

And remember, DON’T FORGET THE SUGAR!

Lemon Ice Cream


Lemon Ice Cream Ingredients 

  • 1 1/2 Cups Heavy Cream
  • 1 Cup Whole Milk
  • 3/4 Cup Sugar
  • 2 Tablespoons Lemon Zest
  • 1/8 Teaspoon Salt
  • 6 Egg Yolks
  • 3/4 Cup Lemon Juice

Step 1:  Pour milk, cream, sugar, zest and salt in a medium sauce pan and bring to a boil. Stirring until all the sugar is dissolved.

Step 2:  In a small separate bowl, mix together the egg yolks until smooth.

Step 3:  Very slowly pour the hot cream/milk mixture into the yolk, making sure you are stirring constantly to prevent the eggs from curdling.

Step 4:  Pour the egg/cream mixture back into the sauce pan and cook over medium low heat for 3-5 minutes and the mixture coats the back of the spoon. Remember to keep stirring constantly and do not let this mixture boil.

Step 5:  Stir in the lemon juice and let cool on the counter until it’s at room temperature. Stir occasionally.

Step 6:  Personally, we always make our ice cream base the day before we need it so it can chill overnight. This comes from tons of trial and error, but if you don’t have the time, chill in the fridge for at least 3 hours.

Step 7:  Transfer the chilled mixture to the bowl of the ice cream maker and churn according to the manufactures setting. Lemon Ice Cream

Step 8: Freeze for at least four hours before serving. We served ours with…..LEMON CURD. Who needs chocolate sauce when you have lemon curd?! Lemon Ice Cream