Bumped Up Red Sauce

We obviously love to cook, and we have no problems spending hours doing so, but some days we’re so incredibly lazy and all we want to do is have a quick and easy dinner.

One of our favorite no fuss dinners is taking a jar of marinara sauce and bumping it up to its full potential. The first thing you want to do is find a marinara sauce with as few ingredients as possible, and you want to be able to pronounce everything in the sauce (tomato, garlic, olive oil, salt, etc).

Bumped Up Marinara

This is one of our favorite sauces to use. Incredibly flavorful and you can read all the ingredients! AMAZING! `


Bumped Up Marinara Sauce 

Ingredients 

  • 1 Jar Marinara Sauce
  • Olive Oil
  • Half of a Red Onion (chopped)
  • 2 Cloves Garlic (minced)
  • Red Wine (an Ina splash=as much as you like)

Step 1: 

In a saucepan, drizzle about 1 to 2 tablespoons of olive oil and heat over medium heat until the oil starts to “dance”.

Step 2: 

When the oil is good and hot, drop the onions in the pot and sauté until tender.

Step 3: 

Before you add the garlic to the onions, and a tiny bit more olive oil and then add the garlic. Sauté until fragrant or about 1 minute. If there are brown bits at the bottom of the pot, don’t fear!

Step 4: 

Once the garlic is nice an fragrant add a couple of splashes of red wine and let simmer for a few minutes. Once that has reduced slightly add your marinara sauce, turn the heat to low and simmer until heated through.

Step 5: 

Mix with your favorite pasta and enjoy!

Perfect Bacon

Hi! We’re back! Did you miss us? We’re sure you did, but now we’re back and have some many wonderful recipes to share.

Today’s recipe is foolproof. It would be really hard to screw this one up. All you need is some bacon and oven. Oink oink!

Perfect Bacon


Perfect Bacon 

What You Need 

  • Bacon
  • Sheet Tray
  • Parchment Paper
  • An Oven

Step 1: 

Line your sheet tray with parchment paper.

Step 2: 

Lay your bacon on the parchment lined tray.

Step 3: 

Stick the bacon in a COLD oven, this is really important if you want the most perfect bacon. Once the bacon is in the oven, turn the heat to 400°. Let the bacon cook for about 20 minutes, and then ta-da! Perfect bacon!

Perfect Bacon


See? How freaking easy was that? You don’t have to stand over your bacon worrying about it burning! And the best part?  No mess and a easy clean up.

Rustic Roasted Root Vegetables

Another healthy favorite in this household is roasted vegetables. You can’t really go wrong with any vegetables your roast, but these are some of our favorites.

Simple, easy, and healthy! You really can’t go wrong, so go forth and roast some veggies!


Rustic Roasted Root Vegetables

Ingredients

  • 1-2 Yams or Sweet Potatoes
  • 2 Carrots
  • 2 Parsnips
  • 1 Medium Onion
  • 2 Large Red Potatoes
  • 21 Season Salute (Trader Joe’s)
  • Kosher Salt
  • Peper
  • Garlic Olive Oil (Plain is fine too)

Step 1: 

Preheat your oven 425°.

Step 2: 

Roughly peel and chop your vegetables and place them on a baking sheet.  Mix together.

Step 3: 

Drizzle the olive oil over the vegetables and using your hands, mix together well. Season with the Season Salute, a little kosher salt, and fresh ground pepper.

Step 4: 

Place in the oven and bake for 30 minutes or vegetables are fork tender. Right before I take them out, we turn on the broiler and leave them for just a couple more minutes to get them nice and crispy.

Rustic Roasted Root Vegetables

Crunchy Oven “Fried” Chicken

We used to love fast food, and we ate quite a bit of it especially during the time we graduated high school and graduated college . But as we grew up, and realized that eating fried chicken fingers probably wasn’t the best or healthiest idea and started looking for healthy alternatives.

This recipe is a healthy version of fried chicken fingers, but with less calories and waaaaay more flavor. Yes, it does require more work than going through a drive-thru, but your waist and heart will thank you.


Crunchy Oven “Fried” Chicken

Ingredients 

  • 1 package chicken breast “tenders”
  • 1/2 cup goldfish
  • 8 saltine crackers
  • 1/2 cup Italian bread crumbs
  • 3 eggs
  • splash of milk
  • garlic salt
  • pepper
  • garlic powder
  • Olive Oil Spray

Step 1: 

Preheat your oven to 375°.  Cover a baking sheet with tin foil and spray with olive oil spray.

Step 2: 

In a food processor or a plastic ziplock bag pulse the saltines and the goldfish until it makes a crumb like texture. Mix with the bread crumbs in a shallow dish.

Step 3: 

In a medium bowl, beat eggs, milk, a little garlic powder, salt and pepper together.

Step 4: 

Season the chicken with salt and pepper. Dip the chicken in the egg mixture, and then coat the chicken with the crumbs. For the best results, after you’ve coated the chicken a first time, return to the egg mixture and then back to the crumbs. This will make for extra crunchy chicken! Place on prepared baking sheet.

Step 5: 

Baking the chicken for 20 minutes or until the internal temperature is 165°. Let rest for a couple of minutes and then enjoy!

Aunty Alyce’s Ukrainian Panetone (Babka or Paska)

Paska is a traditional Ukrainian Easter sweet bread. It’s normally braided in a fashion similar to challah and the three braids represent the Holy Trinity. The traditional round shape of the bread also represents God, and remind us that God has no beginning and no end.

According to Wise Geek, Easter food originated in the Ukraine or Poland. And it’s believed that this type of food was introduced to the U.S. by people of the Mennonite Faith. Normally, Paska or Babka is made with very few ingredients and is a very simple bread.

It may seem like a lot of steps, and we won’t lie to you, it will take up a  good chunk of your day. But let us tell you, it’s totally worth it. This was the first bread we’ve ever made, and we think it’s a great starter bread because it’s not that hard to make just time consuming. But hey, the best things take time right?

**We apologize in in advance for the blurry photos, we didn’t realize that the lens was dirty. So sorry in advance.

Aunty Alyce’s Ukrainian Panetone  (Babka or Paska)


Ingredients

  • 2 1/2 cup raisins
  • 2 packages of dry yeast
  • 1 cup lukewarm water
  • 1 tablespoon sugar
  • 8 egg yolks
  • 2 whole eggs
  • 1 1/2 cup sugar
  • 12 cups AP flour (at minium, sifted)
  • 2 whole oranges (including zest and juice)
  • 1 lemon zest
  • 1 tsp salt
  • 1/2 quart milk (scalded, then cooled)
  • 1 stick + 2 tablespoons (melted)
  • Flour for sprinkling and kneading
  • 1 egg (beaten)
  • 2 tsp sugar
  • 1/3 cup of water
  • 2 tablespoon of sugar

Step 1: 

If you’re in a hurry, put raisins in a bowl and cover with hot water to plump them up. If you have the time, it’s best to cover the raisins with your choice of triple sec, orange juice, or even water and let them sit over night to really reconstitute them.

Step 2: 

Dissolve 1 tablespoon of sugar in 1 cup of lukewarm water. Sprinkle the yeast over the water and let stand of 10 to 15 minutes.

Aunty Alyce’s Ukrainian Panetone  (Babka or Paska)

(Isn’t that yummy looking?)

Step 3: 

Preheat the oven to 170°.

Step 4: 

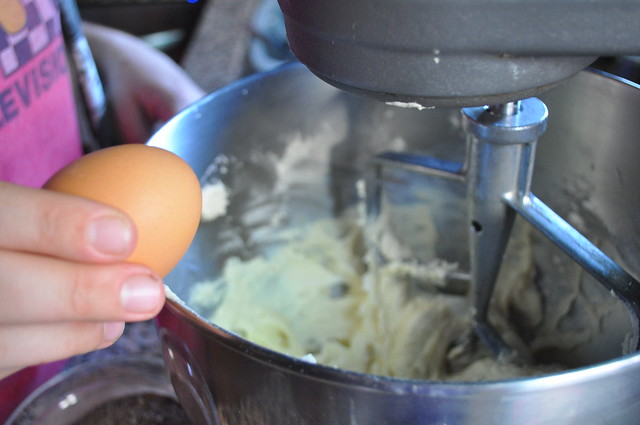
In a stand mixer (or with a hand mixer) beat eggs on a high speed until light in color.

Aunty Alyce’s Ukrainian Panetone  (Babka or Paska)

Aunty Alyce’s Ukrainian Panetone  (Babka or Paska)

Step 5: 

Next, add the sugar gradually while the mixer is still beating the eggs.

Aunty Alyce’s Ukrainian Panetone  (Babka or Paska)

Step 6:

Add the salt, cooled milk, zest of the lemon and orange, orange juice, and melted butter. Mix until combined.
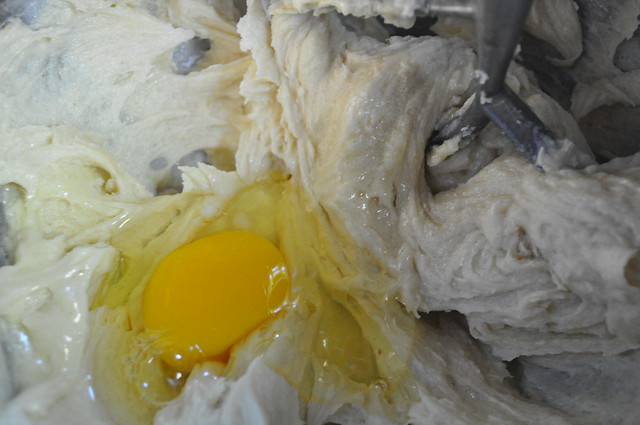
Aunty Alyce’s Ukrainian Panetone  (Babka or Paska)

Aunty Alyce’s Ukrainian Panetone  (Babka or Paska)

Step 7: 

If using a stand mixer, replace whisk attachment with dough hook. Start very slowly adding the flour, about a 1/4 of a cup at a time. Do this until all flour is incorporated. This will be a very sticky dough.

Step 8: 

Next transfer the dough to a floured counter-space, add the drained raisins to the dough and continue kneading. Add flour as kneaded (heh heh).

Aunty Alyce’s Ukrainian Panetone  (Babka or Paska)

Aunty Alyce’s Ukrainian Panetone  (Babka or Paska)

Aunty Alyce’s Ukrainian Panetone  (Babka or Paska)

Aunty Alyce’s Ukrainian Panetone  (Babka or Paska)

Aunty Alyce’s Ukrainian Panetone  (Babka or Paska)

(See how sticky it is, don’t be alarmed, just keep kneading and adding flour)

Aunty Alyce’s Ukrainian Panetone  (Babka or Paska)

Step 9: 

Pace in a large bowl, and cover with a  damp dish towel. At this point, turn off the oven (and open the oven door to let out some heat). Place the covered dough in the oven and allow to proof (raise). This all depends on where you are, how hot it is. It took ours about an hour and half to double in size.

Aunty Alyce’s Ukrainian Panetone  (Babka or Paska)

Aunty Alyce’s Ukrainian Panetone  (Babka or Paska)

While we waited for the dough to rise, we played hide the treat with Peaches.

Peepers

Step 10: 

Once the dough has doubled in size, punch down the dough again, and let raise again.

Aunty Alyce’s Ukrainian Panetone  (Babka or Paska)

Step 11: 

While the dough is rising, prepare your bread pans. Now there are two ways to do this, the first is to butter the pan, and then cover with parchment paper. Or, you can just spray cooking spray. Both work perfectly, and it’s really your preference.
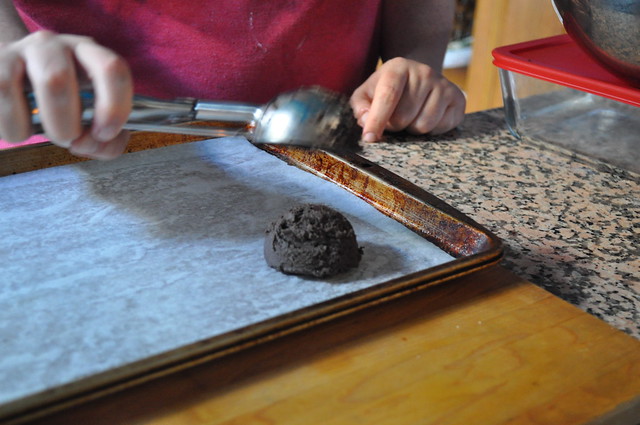
Step 12:

Divide the dough between the pans (we used FIVE) and once again cover with a damp dish towel, and let double in size. Preheat the oven to 375°.

Aunty Alyce’s Ukrainian Panetone  (Babka or Paska)

Aunty Alyce’s Ukrainian Panetone  (Babka or Paska)

Step 13:

Before you put the loaves in the oven, mix together one egg and two teaspoons of sugar and brush over the loaves. Bake at 375° for 10 minutes. Then lower the heat to 275° and bake for 25 to 30 minutes or until the the internal temperature reads 185° to 190°. 

Aunty Alyce’s Ukrainian Panetone  (Babka or Paska)

Step 14: 

When the loaves are done, remove from the oven and glaze with sugar dissolved in water. Let stand in the pans for 10 minutes before removing.

Aunty Alyce’s Ukrainian Panetone  (Babka or Paska)

The traditional way to enjoy this bread (according to Aunty Alyce)  is toasted with a little butter.


We made this bread in honor of Grandma/Aunty Alyce. She passed away at the age of 92 last November. We definitely felt her presence while we were making this! 🙂

gma

Pro Baking Tip #1

Making a Stabilizer

Ingredients 

  • 1 Tablespoon Cold Water
  • 1/2 Teaspoon Unflavored Gelatin

Step 1: 

In a small ramekin, put the water in and stick in the freezer for 3 to 5 minutes. Remove and sprinkle 1/2 teaspoon of unflavored gelatin over the cold water.

Step 2: 

Let this sit for 5 minutes. Do not touch! Just leave it alone!

Step 3: 

While the mixture is setting, heat some water.

After five minutes, place the ramekin in a larger bowl and pour the hot water around the ramekin. Be careful not to get any water into the gelatin mix.

Stir the gelatin until it starts to soften and turns clear. Remove for the water bath and let come to a room temperature (that doesn’t take very long).

Step 5: 

If adding to whipped cream, only add the stabilizer as the whipped cream starts to take shape, if you add it any sooner, the whipped cream won’t be able to form!


A stabilizer is great when making whipped cream, especially when it has to sit out for a while. Growing up in my house (Marlee) we didn’t and still don’t have central air, so making a stabilizer in the summer was crucial to keeping and sort of whipped topping.

Making a stabilizer isn’t hard and it’s totally useful in so many recipes! Especially if you have the cookbook (a personal favorite) Milk Momofuku Milk Bar by Christina Tosi. A lot of her recipes call for a sheet of gelatin, but if you don’t have a sheet of gelatin, you make a stabilizer! All very exciting and useful.

kft-140_1z

Meyer Lemon Curd

This curd may be one of the best things we have ever made. And the recipe comes from the Queen Ina Garten, so you know it’s good. And it’s easy.

Last week when we were shopping we saw Meyer Lemons, and this is first time we had seen them in the market so we obviously bought 6 bags of lemons not knowing what we were going to do, but we knew it would be something amazing.

This recipe was the first of many Meyer Lemon Recipes that we will be sharing. We’re honestly looking into buying a Meyer Lemon Tree so we have unlimited Meyer Lemons.

This curd is probably one of the best things you can make with these lemons. It’s so good, you can just eat it with a spoon or on toast.

Meyer Lemon Curd


Meyer Lemon Curd 

What You Need: 

  • A mini food processor (Or Big)
  • Saucepan
  • Wooden Spoon

Ingredients: 

  • 7 Meyer Lemons (3 if using regular lemons)
  • 1/2 cup (from lemons above)
  • Meyer lemon zest (from the lemons used for juice)
  • 1 1/2 cup bakers sugar
  • 1 stick of unsalted butter (room temperature)
  • 4 large eggs
  • 1/8 teaspoon kosher salt

Meyer Lemon Curd

Step 1: 

Because Meyer lemons are smaller you need more to make this curd, zest the lemons and try to avoid zesting the white part of the lemon, which is called the pith. After you zest the lemons cut the lemons in half and juice them.

Meyer Lemon Curd

Step 2: 

In a food processor pulse together the sugar and lemon zest until the lemon zest is fully incorporated to the sugar. The sugar will have a “damp” texture.

Meyer Lemon Curd

Meyer Lemon Curd

Meyer Lemon Curd

Meyer Lemon Curd

Step 3: 

Cream together the butter and then mix in the butter.

Meyer Lemon Curd

Meyer Lemon Curd

Step 4: 

Beat in the eggs one at a time and then add the salt and lemon juice. At this step, the curd is going to look absolutely disgusting, you’re probably going to think you fucked it up. Don’t worry. It’s supposed to look that way. Trust us.

We don’t have pictures for this step, because honestly, when we did it, we (Marlee) thought we screwed up. So we stopped taking pictures, BUT KEEP GOING. IT’S WORTH IT.

Step 5: 

Next, transfer the mixture into a sauce pan. Stir constantly over a low heat until the mixture starts to smooth out and eventually begins to thicken.

Check occasionally with a digital thermometer and when the temperature reads 170° you can remove from the heat. Cool to room temperature and then refrigerate.

Meyer Lemon Curd

Meyer Lemon Curd

Look at how beautiful this is. So smooth, so creamy! So luscious!

Meyer Lemon Curd

Perfect Smoothie

Alton Brown says the best way to start your morning is with something purple. And he doesn’t mean Barney. Is that a weird outdated reference? I guess our age is showing.

Anyways, the best way to start your morning is a smootie! A nice big purple smootie!

Ingredients 

  • 1 small container Fage Greek yogurt (we used Strawberry)
  • 1 cup orange juice
  • 1 cup vanilla coconut milk
  • 1 cup pineapple (frozen)
  • 1 1/2 cups mixed berries (frozen)
  • 1 scoop vanilla protein powder
  • 1 banana

Blend together until smooth. This usually makes two perfect servings. You can easily adjust this to how much you need.

Beef Stroganoff Hamburger (Lord)HelpMe Style

This is our homemade Hamburger Helper, inspired by a wonderful recipe that found us while we were hungry at the market. NEVER SHOP HUNGRY!

Anyways, this is a great alternative to the box stuff because shocker: it doesn’t have a hundred unnecessary chemicals! We always try to make the things we love but don’t love us back. Then we skip the chemicals and add the fun!

Even if you don’t think you’ll like this, it’s an elevated version, and tastes really good!

Note from Christie: I used to eat the instant microwave version of this in my dorm freshmen year of college. Oh the meat, it was so chewy. NEVER AGAIN!!

Beef Stroganoff Hamburger (Lord)HelpMe Style


Ingredients 

  • 1 tablespoon olive oil
  • 1 cup mushrooms (chopped)
  • 1 cup onion
  • 1 lb ground beef
  • 1 cup milk or sour cream
  • 1 1/2 cups beef broth/stock/or water
  • 1 tablespoon flour or cornstarch
  • 1 1/2 teaspoons salt
  • Black pepper
  • 1 teaspoon paprika
  • Onion powder
  • Garlic powder
  • Worcestershire sauce
  • Noodles (traditional egg noodles or we used quinoa pasta from Trader Joe’s)

Step 1:

Dice or mince onions and mushrooms into an uniform mixture.

Beef Stroganoff Hamburger (Lord)HelpMe Style

Step 2:

Heat skillet with olive oil and sauté until the mixture is half-way done, then add the meat to brown. Season with salt, pepper, onion powder, garlic powder, and Worcestershire sauce.

Beef Stroganoff Hamburger (Lord)HelpMe Style

Beef Stroganoff Hamburger (Lord)HelpMe Style

Beef Stroganoff Hamburger (Lord)HelpMe Style

Step 3:

Add beef stock and either milk or sour cream (I don’t think you need both, because I think it’s too much), and cornstarch to thicken.

{So, we didn’t take a picture of this part because it looked hideous, but tasted great. We just didn’t want to scare you away from this because of this ugly duckling stage.}

Step 4:

Add noodles, cook until pasta is done. We prefer al dente, but some people, *cough*Franny*cough*,  love(s) mushy pasta.

Beef Stroganoff Hamburger (Lord)HelpMe Style

P.S.  This is commitment:


Darkside Cookies

4474065261_4f95455a3d_z

Yup, thats right. These are the cookies that the Darkside has been promising if you join them.

Darkside Cookies


Darkside Cookies

Ingredients 

  • 1 cup (2 sticks) cold butter, salted
  • 1 cup white sugar
  • 1/4 cup brown sugar
  • 1/2 tsp instant espresso
  • 1/2 cup dark cocoa powder
  • 2 1/4 cup of AP flour
  • 1 tsp baking powder
  • 1 cup semi-sweet chocolate chips
  • 1/2 cup of dark chocolate chunks
  • 1 tsp vanilla

Darkside Cookies

Step 1:

Preheat oven to 350° and line cookie sheets with parchment paper. Use Pam underneath the parchment paper to keep it from moving.

Step 2:

Cream together the butter and sugar in a mixer.

Darkside Cookies

Darkside Cookies

Step 3:

Add eggs, one at a time, and then the vanilla.

Darkside Cookies

Darkside Cookies

Step 4:

Mix together flour, baking powder, cocoa and espresso powder.

Step 5:

After that start putting in the flour/cocoa mixture in batches until fully mixed.

Darkside Cookies

Darkside Cookies

Step 6:

Mix or fold in the chocolate chips and chunks. Taste dough, because that’s what making cookies is all about!

Step 7:

Use an ice cream scoop to get uniform cookies. (Spray the scoop with Pam first so the dough doesn’t get stuck.)

Darkside Cookies

Darkside Cookies

Step 8:

Bake cookies for 10-14 minutes. We suggest to under bake them a little so they stay wonderfully chewy, so start at 10 minutes and decide from there.

Darkside Cookies

ENJOY